Basic HR accounting settings. Basic HR accounting settings How to correct personnel number in 1s 8.3
The time sheet is a document that we prepare monthly. And of course, it was inconvenient for an accountant before - before the appearance of the time sheet form in 1C 8.3 - to fill it out in Excel tables. Now the timesheet is being generated in 1C 8.3, but not everyone knows where to find it. After reading this article you will have no questions left.
You will learn:
- how to make a time sheet in 1C 8.3;
- what this document is;
- how to fill out a time sheet in 1C 8.3 Accounting.
The obligation to keep records of the working hours of each employee is established by Art. 91 Labor Code of the Russian Federation. If records are not kept, regulatory authorities can hold the employer liable for violation of labor laws in the form of a warning or a fine (Part 1 of Article 5.27 of the Code of Administrative Offenses of the Russian Federation):
- from 1,000 to 5,000 rubles. - for officials and individual entrepreneurs with employees;
- from 30,000 to 50,000 rub. - for organizations.
There is no time sheet among the mandatory documents used by the organization. The working time of employees can be taken into account by another document developed independently and approved by the accounting policy.
However, it is the time sheet that has been firmly entrenched in the customs of business document flow since the time when the unified forms T-12 and T-13 developed by the State Statistics Committee of the Russian Federation (Resolution of the State Statistics Committee of the Russian Federation dated January 5, 2004 N 1) were mandatory for use. Today, these forms, with minor modifications, are used by employers everywhere. They are convenient and informative.
A timesheet in 1C is the primary document on the basis of which the accountant calculates wages, vacation pay, and travel allowances to employees. It is a table where all attendances and absences of employees during the month are noted, the number of hours worked per day, and the reasons for absence from the workplace.
The timesheet is filled out by an employee authorized by the manager, or by the employee whose job responsibilities include maintaining the timesheet. Most often, these are department heads who know about the plans and tasks of their subordinates, or employees specially appointed to the position of timekeeper.
An accountant, as a rule, does not prepare a time sheet, but receives ready-made information at the end of the month and, based on it, creates a payroll sheet. Time sheets are filed in separate folders and can be stored in the accounting department along with salary documents. The total shelf life of time sheets is 5 years, for employees with harmful and difficult working conditions - 75 years (Order of the Ministry of Culture of the Russian Federation dated August 25, 2010 N 558).
Time sheet in 1s 8.3 Accounting: where to find
In Accounting 8.3, a time sheet is more of a report than a working document. The timesheet is filled in automatically based on the data Production calendar and documents Vacation And Sick leave . Personnel documents are also taken into account Recruitment And Dismissal .
in 1C 8.3 Accounting can be found in the section Salaries and personnel – Personnel records – HR reports – Timesheets.

Production calendar
filled out in accordance with Production calendar according to a 40 hour work week schedule.
Built-in Production calendar cannot be customized or changed, since it is compiled in accordance with the holidays and transfers of weekends for the year approved by the Decrees of the Government of the Russian Federation. However, if necessary, for example, to take into account an additional holiday established by the Government of the region of the Russian Federation, Production calendar can change.
To make adjustments, go to Main menu – All functions – Directories – Production calendars – Russian Federation.
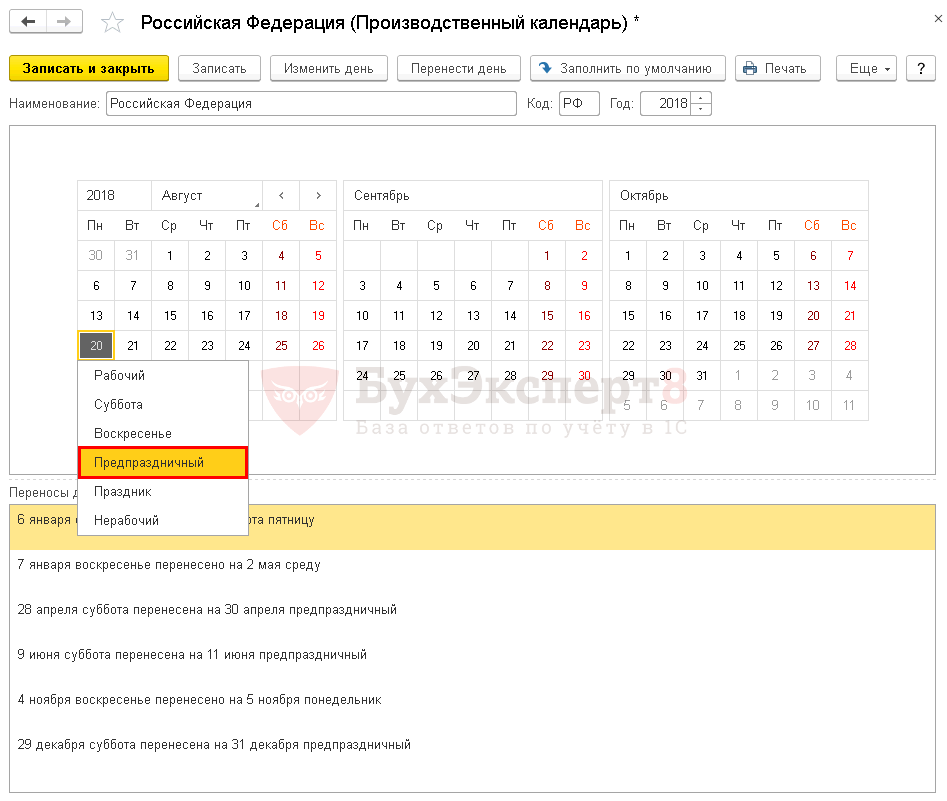
Open the menu with the right mouse button on the selected date and select:
- Change- to change the day status to:
- Worker;
- Saturday;
- Sunday;
- Pre-holiday;
- Holiday;
- Non-working;
- Postpone- to transfer the existing status of a day to another day with a different status.
How to generate a time sheet in 1C
In order to form in 1c Time sheet , make the following settings.
Step 1. Report header
To generate a report Time sheet (T-13) fill in the fields:
- Period- the month for which the timesheet is generated;
- Organization - install from the list if there are several organizations in the database;
- Subdivision - select from the directory Divisions , if you need a report card separately by department.
Click on the button Settings .

Step 2. Simple view, Screenings tab
On the tab Selections kind Simple establish the names and positions of the responsible persons who must sign this report card. Here, if a time sheet is drawn up for one person, for example, an additional sheet. You can install:
- tick Employee ;
- employee's last name - selected from the directory Employees link Selection .

Step 3. Structure
If you need a timesheet for all employees, uncheck the box Employee and continue customizing the timesheet by setting:
- View - Advanced.
On tabs Selections , Fields and sorting nothing needs to be changed. By default, the timesheet is generated separately for each department. If there are few employees in the organization, but there are divisions, you can form Time sheet (T-13) in the organization as a whole.
To do this you need to go to the tab Structure in grouped fields of the first level, remove from the grouping Subdivision .
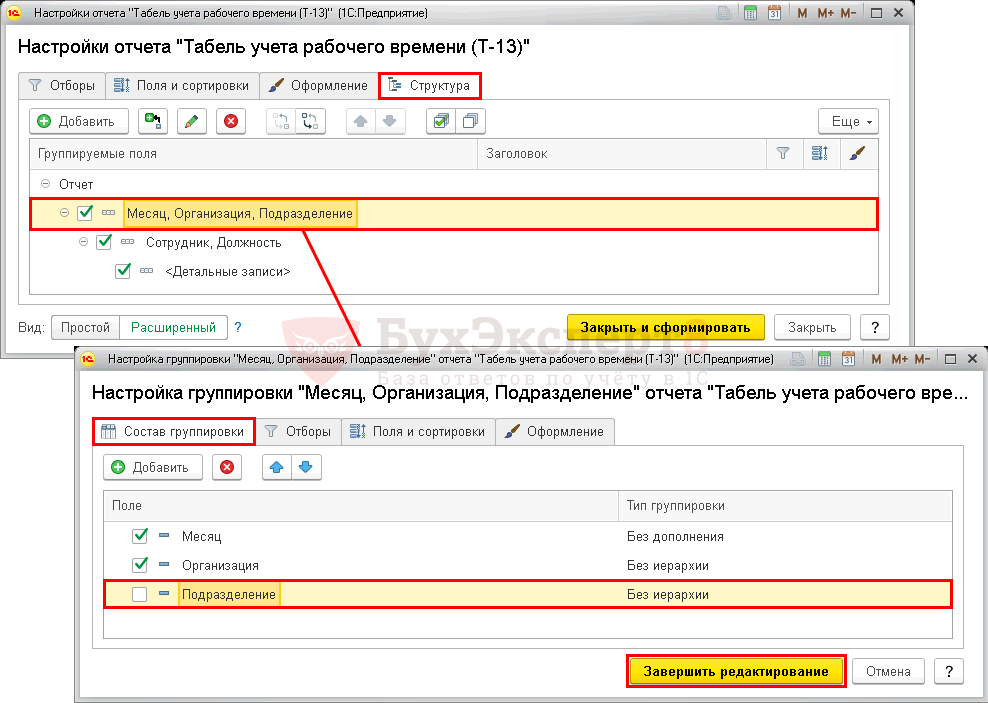
Then click Finish editing – Close and form. The generated report will look like:

How to keep a time sheet in the 1C 8.3 program
Maintaining a time sheet in 1C Accounting 8.3 comes down to monthly report generation Time sheet (T-13) immediately before or after payroll for the month.
Before creating the timesheet, please note:
- Production calendar for the year must be configured in accordance with the working hours of your region and organization;
- personnel documents on the hiring and dismissal of employees in a given month must be completed;
Hello, our dear partners, friends and random visitors to our site. Today I want to talk to you about another interesting and important change in the 1C Accounting 8.3 program, which went unnoticed for many of you. Namely: did you know that now in order to print a “Time Sheet” you do not have to buy a separate program or download a form on the Internet. Now this document will help you make Accounting 8.3!
Let's see where to find it and how it is filled in in the program.
In the “Salaries and Personnel” section in the “Personnel Accounting” menu, open “HR Reports”.

In the window that opens, select the “Timesheet” report

The report allows you to select a specific department. If the “Division” flag is not set, then the Timesheet will be generated for all departments. Each division is on a separate sheet.
In this case, information on employees is filled out in accordance with the production calendar and the “Sick Leave” and “Vacation” documents entered in the program.

By default, the program does not fill in data about the employees signing the document. To print information about signers, use the “Settings” button.

In this case, the entered data will be reflected in the Timesheet for all departments.

In addition, the program has the ability to generate a Time Sheet only for selected employees. To do this, in the report settings, you need to check the appropriate box and select from the list of employees those for whom you want to print the document:


That's all I wanted to introduce you to today. WITHStay tuned for updated articles on our website. Join our social groups. networks and always be aware of all changes in the program. Work in 1C Accounting with pleasure.
HR accounting settings are made in the section Settings – HR records.
To check the settings for personnel records, you can print them by clicking the button at the very top of the settings HR settings :
Uniqueness of personnel numbers
Control over the uniqueness of personnel numbers is configured by checking the box The uniqueness of personnel numbers is controlled :

If the checkbox is checked, the program will not allow you to create two employees with the same personnel number. If the checkbox is cleared, then uniqueness is not controlled.
By default, the personnel number will be assigned taking into account the infobase and organization prefix. Thus, the presence of prefixes ensures the uniqueness of personnel numbers within the organization.
Part-time work
The possibility of working part-time is set using the checkbox Part-time work is used :

After this, in personnel documents it becomes possible to indicate the number of positions occupied, otherwise this detail is not displayed at all in the documents. In addition, if this box is not checked, then there is no way to configure part-time schedules.
Using a side hustle mechanism
The ability to use the side hustle mechanism appears after checking the box Part-time jobs are used :

Part-time work is almost like hiring an employee for an “internal part-time” job, but without formalizing the employment and employment contract. In this case, the employee at the place of work can be assigned:
- all accruals of the replaced employee or position;
- work schedule for calculating payment at the place of part-time work.
Since the hiring process is not processed, the employee does not take up an additional staffing rate.
An employee at the place of part-time work appears as a separate element in the document Calculation of salaries and contributions , in payroll reports, timesheets.
Basic staffing settings
Settings for staffing are opened from the personnel accounting settings form using the link Setting up staffing .
Staffing is maintained
In the basic and PRO versions of 1C: ZUP 3, you can refuse to maintain a staffing table. To do this, in the staffing settings form, you can uncheck the box Staffing is maintained :

Then, when hiring, the employee’s position will be selected from the directory Positions .
If the staffing table is maintained, then the position selection will be made by selecting from a directory Staffing table (Personnel – Staffing – Staffing).
After transferring data from 1C:ZUP 2.5 checkbox Staffing is maintained is installed by default, but can be disabled.
A history of staffing changes is maintained
Setting up staffing history is done using the checkbox.
If the history of changes is not maintained, then the staffing table is edited directly in the directory Staffing table and you can generate a report on the staffing table only at the current moment.
If checkbox A history of staffing changes is maintained installed, then editing of staffing positions occurs using special documents Change of staffing , Approval of staffing (Personnel - Staffing - Changes in staffing). At the same time, you can print out the current staffing table or get a staffing report for any date.
Maintaining military records
The ability to maintain military records is activated by checking the box Military registration is maintained :

After checking the box, the following options appear:
- entering military registration data in the employee’s card;
- classification of positions by military registration categories;
- generation of reports on military registration.
Rule for forming employee representations
The rule for generating employee representation is configured at the very bottom of the HR accounting settings form in the block The rule for forming the presentation of elements of the employee directory in reports and documents :

This function is useful if the employee is accepted as a main employee and an internal part-time worker. Then, in the on-screen forms of documents and reports, this employee can be distinguished by the name postfix. The view works where a link to a directory element is displayed Employees. The presentation itself depends on the selected settings (full or brief full name, type of employment, addition, etc.):

Reading time:
What questions were most often asked by 1C: Accounting 8 users? If you have any other questions, ask them in the comments, experts will answer you.Question 1: when accruing salary, I cannot set/change the accrual date
After updating to version 3.0.54.20, the “Payroll” document was modified, and the “Document Date” field is set by default to the last day of the month, which is not available for editing.If you still need to put it on something other than the last day of the month, then try posting administration documents.
Uncheck “Set time automatically”.
Another option: Administration - Personal settings - Working date (set the desired date and re-post the document for calculating Salaries and Contributions) /
The bug was fixed in the latest release:
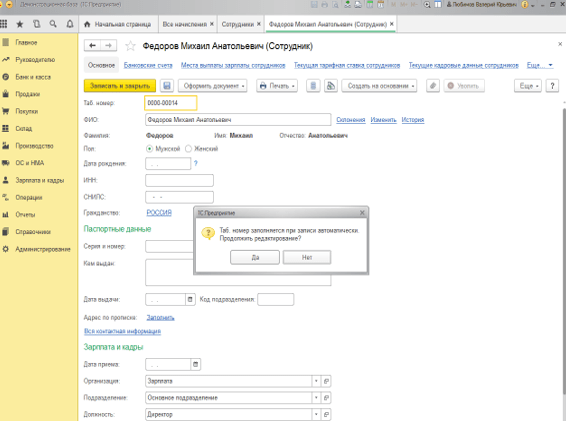
Question 2: how to change the personnel number of an employee in “1C: Accounting 8” (rev. 3.0)?
You need to go to the Employee’s card, click on the “More” -> “Change Form” button. Check the box “Tab. Number".Then the field will be available for editing.
In the field that appears, click “Yes”.
Question 3: how to calculate an advance to an employee in 1C: Accounting 8 (rev. 3.0)?
The program implements two methods for calculating the advance:Fixed amount;
Percentage of salary (percentage of all planned employee accruals).
An advance is a payment, not an accrual.
Therefore, the calculation and payment of advance wages in the form of a fixed amount or an amount as a percentage of the salary (it includes all planned employee accruals) is made using the following documents: Statement to the cash register(chapter Salary and personnel - Salary - Cash register statements) or Statement to the bank.

Question 4: how to add a foreign currency account in “1C: Accounting 8” (rev. 3.0)?
Answer: To add a foreign currency account to the program first you need to add foreign currency to the currency directory. Only after this will account 52 be displayed in the chart of accounts, and in the “Bank Accounts” directory you can create a foreign currency account.Adding a foreign currency account:
- Menu: Main-Organizations.
- Select the required organization by double-clicking on it with the left mouse button (or press the “F2” button).
- Follow the "Bank Accounts" hyperlink.
- "Create" button.
- Enter the bank's BIC and foreign currency account number.
- The “Account currency” field is determined automatically in the program based on the number of the entered foreign currency account.
- “Save and close” button.


Question 5: where to indicate the amount of the acquiring bank’s commission in “1C: Accounting 8” (rev. 3.0)?
When accepting payment by payment cards from customers in the 1C: Accounting 8 program (rev. 3.0), it is necessary to take into account the terms of service of the acquiring bank. To reflect the amount of the bank commission, you must do the following:- Menu: Sales - Retail sales-Retail sales report.
- On the “Non-cash payments” tab in the “Types of Payments” directory, indicate the size of the servicing bank’s commission: fixed percentage or floating depending on the transaction amounts.
- Section bank and cash desk transactions on payment cards cell type of payment create.
